The order details page is where new orders may be created, and existing orders may be modified. The order details page is a live page; any changes made on this page are saved in real time as they are made in order to ensure the chance of data loss is minimized.
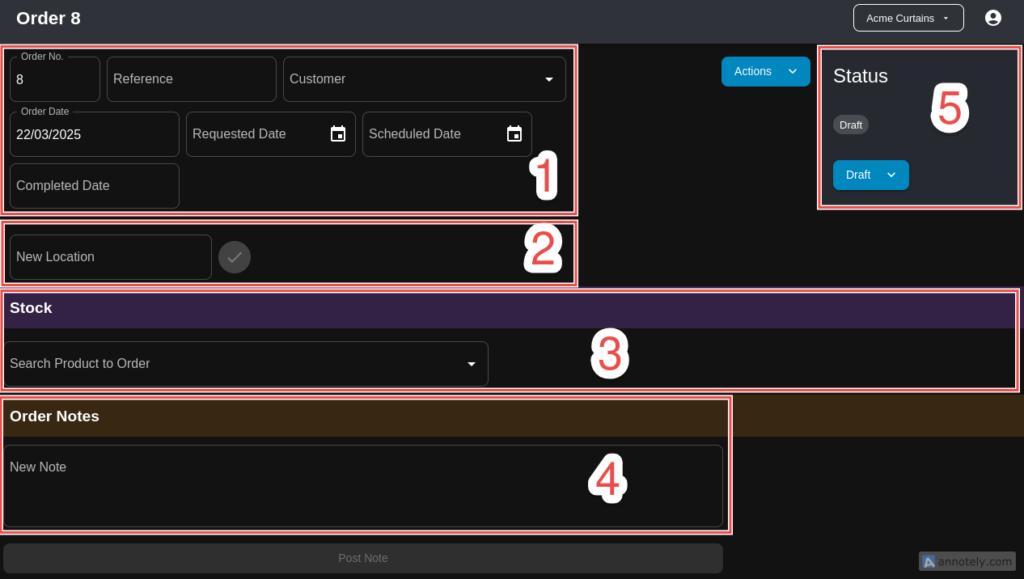
The page is divided into a number of areas:
- 1 – Basic Order Details
- 2 – Made to Order Products
- 3 – Stock Order
- 4 – Order Notes
- 5 – Order Status and Workflow
Each of these are described in greater detail in the following sections.
Basic Order Details #
This section contains the basic details for every order:
- Order No – the unique order number for the order. This value is automatically generated however may be overridden (although not by the customer). When a new order is created, the current highest existing order number will be incremented by 1 and that will be the new order number.
- Reference – optional reference value provided by the customer for the order.
- Customer – the customer which the order is for
- Order Date – the date that the order was posted. This value is set automatically.
- Requested Date – the date that the customer requested the order be completed by. This is an optional field.
- Scheduled Date – the date that the order is scheduled to enter production. This is another optional field.
- Completed Date – the date that the order was marked as completed. This value is set automatically when the Complete workflow action is selected.
Made to Order Products #
This section is used to enter made to order products. To begin, start by selecting a new location from the drop-down list, or by typing a custom location name into the New Location field, then click on the green check button.

A new location line will be added to the order. From here, depending on which products your organization has been configured as supplying, it is then possible to add products to the location. For example, if your organization manufactures curtains and curtain tracks then the location line will provide buttons for adding these products to the location:

To learn how to fill in the details for each product type, please refer to the specific product page:
Attachments #
It is possible to attach files to each location within an order. This might be useful for including photographs of the area in which the product will be installed, or to include any technical specs or diagrams that might be related to the production of the order.
To include an attachment for an order, click on the attachment icon: ![]()
Browse to the file that you would like to attach and select it.
Stock Order #
The Stock section of the page allows customers to place orders for stock items. To add a product to the order, start by searching for the product to add in the Search Product to Order field. The search query may either be the product’s sku, product code or by entering some characters from the product’s description.

Once found, click on the product to add it to the order. The order quantity (Order Qty field) may be updated to reflect the quantity of the product to order. Click on the Save button to save the changes or Cancel to cancel the changes.

To edit any stock lines within an order click on the table row containing the stock item. The Order Qty field may be modified and the Status field may be updated to reflect the fulfillment status of the order. After making any changes click Save to save the changes or Cancel to cancel.
Order Notes #
This section may be used to enter any notes for the order. To add a note, simply type it into the New Note text area and click on the Post Note button.
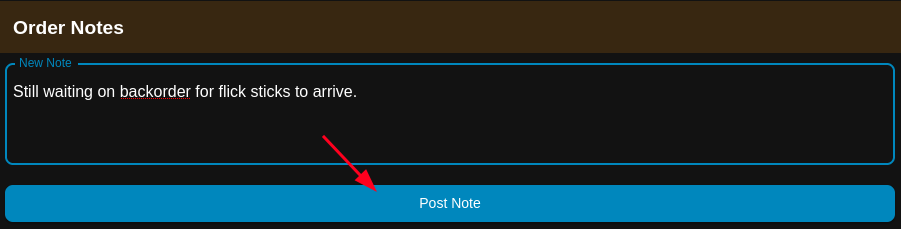
The new note will be added below in reverse chronological order (i.e. most recent notes will be displayed first). Further notes may be added to the order at any time. Notes may be created and viewed by anyone with privileges to view the order, i.e. customers can see and create notes on their own orders in order to provide further information.